Table of contents
General Information
Sometime probably every electronics hobbyist comes to the point where it's time for the first microcontroller (µC) project.

Either because you are just curious and you want to know more and more or you have just created a highly complex circuit and then afterwards you are thinking:
That's crazy...this must also go easier.
And in fact you can often save a lot of components when you use a microcontroller. For newcomers there is the question: AVR or PIC?
At least these are the two largest microcontroller families of the two producers Atmel (AVR) and Microchip Technology Inc. (PIC). Some people say AVRs are better and the other people say PICs are better. My conclusion after a little bit of research is: there isn't a big difference. So I just decided randomly for Atmel. So far, so good. That of course means that I will only concern on Atmel microcontrollers.
AVR programmer
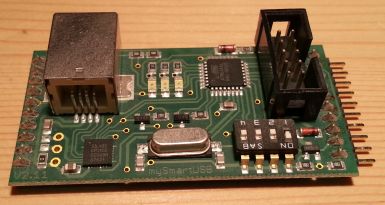
So if you now have also decided for Atmel then your next question will be: how can I program the microcontroller? For the beginning you should definitely buy a ready programmer. The best thing would be a programmer for the USB port. I decided for a programmer called "mySmartUSB" from myAVR (the version of my programmer is 2.11). In fact I bought the "myAVR Board MK2 PLUS" (with display module).
Such a board is a good investment because you can be sure in the first programming attempts, that there are no hardware problems. But of course you can use any other AVR ISP programmer. So that the programmer works, you must download and install the driver for the programmer. In my case it is that driver.
ISP interface
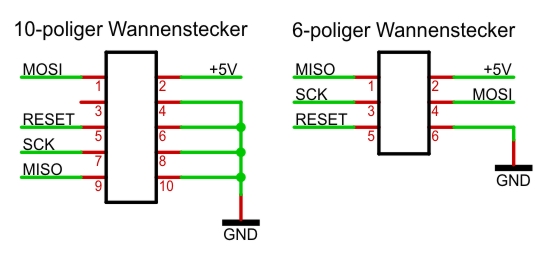
ISP means In System Programming und this means that a microcontroller can be programmed without removing it from the circuit. An AVR is generally programmed by four signal lines: RESET, MOSI, MISO und SCK. By default, either 6- or 10-pin box headers or post jacks are used. Here you can see the normal pin assignment:
Software
For programming it's the best to use the "AVR Studio" or the "Atmel Studio". Here you can find the download links.
Note: If you want to install the AVR Studio in version 4 or older, you must first download and install WinAVR (if you want to program in C).

Ater installing the Atmel Studio 6 there came the message that I still neededd to install Microsoft Visual Studio Service Pack 1, so that everything runs correctly.
After that installation the programm started but I could not make it work with my programmer. It constantly came the error message "Unable to connect to tool STK500 (COM4)". After a bit of googling I read several comments with the message: it's better to use the AVR Studio 4. So I uninstalled the Atmel Studio 6 and then I installed WinAVR and the AVR Studio 4. The Version 4.19 had some problems with the WinAVR installation, so decided to install the older version 4.18 + SP3.
You should avoid to install WinAVR and the AVR Studio 4 in the directory "C:\Program Files (x86)" because this can cause problems due to the brackets in the directory name.
Example circuit
Microcontroller
A good choice for the first microcontroller is the Atmega8. This microcontroller has many programmable inputs and outputs and also many other useful functions. A look at the data sheet tells us the pin assignment.
Circuit
For example a first circuit could be:
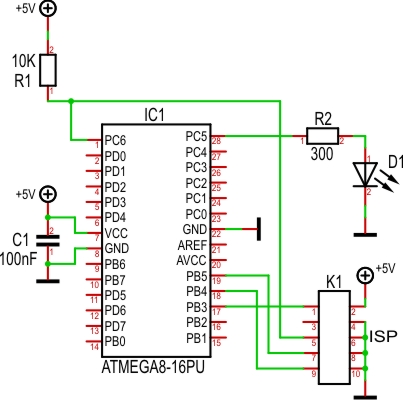
First program (with AVR Studio 4)
For our first program we run the AVR Studio and then click on New Project. In the next window we click on AVR GCC, write a Name in the field Project name and choose a location for saving. Then we go on Finish. After that, we select the correct microcontroller (atmega8) under Project → Configuration Options → Device. In the now opened window we write our program into:
#define F_CPU 1000000	// clock frequency of the µC
#include <avr\io.h>	// AVR register,...
#include <util\delay.h>	// library routines
//----------------------------------------------------------------------
int main(void) {

	DDRC = 0b00100000;	// Pin PC5 is output, all the other pins from PortC are inputs
	while(1) {

		PORTC = 0b11111111;	// PC5 = High
		_delay_ms(1000);
		PORTC = 0b11011111;	// PC5 = Low
		_delay_ms(1000);

	}
	return 0;

}
Then we click on Build Active Configuration (F7). Now we make sure that the programmer is connected to the PC and the circuit.
Then go on Tools → AVR Prog.... Then select the hex file in storage folder\default with Browse. After that you have to click at Flash on Program and then the LED should blink (one second on, one second off). So that the LED blinks really at the correct frequency we click on Advanced we make sure that the value Int RCosc, Frequency 1MHz is selected.
Other
In larger projects, you should also do a little compiler setting, so that really all possibly existing errors and warnings are displayed. For this, go to Project → Configuration Options → Custom Options and add the following entries: -pedantic und -pedantic-errors.

